

This is a sweet cake that is produced around Easter time in the Valencian region, and it’s also one of my favourites!
In fact, I like it so much that I learned to make it, because it’s impossible to source it in London, and I was missing it lots each time I spent Easter in the UK.
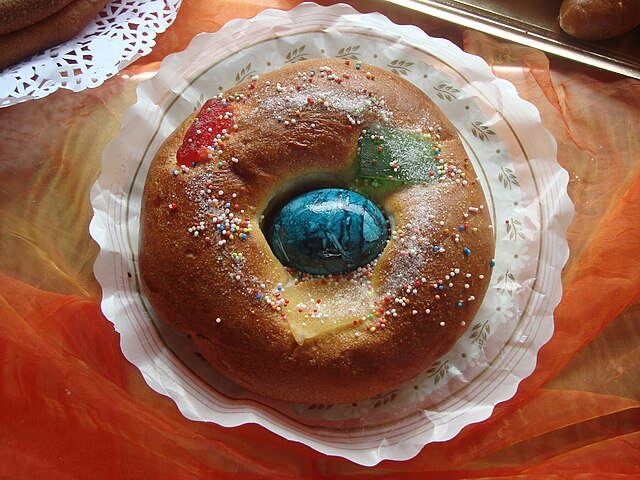
One of the defining features of this bun is that it uses eggs both in the dough and in the decoration, which has many variations: you can brush the top with beaten egg, or whisk the egg white with sugar until it stiffens and use it to decorate the top the bun, or you can even place an egg on the bun before baking, which makes it look like an egg nesting on the bun (this is most typical of the smaller, individual pieces). Often, the eggshells are dyed with food colouring, so this makes for very colourful pieces that you’re sorry to eat.
.jpg)
Tradition has it that you should take a mona with you on a country side walk on Easter Monday, to celebrate the arrival of Spring. Then, when you find a nice and calm spot, you sit down and eat your mona outdoors, while enjoying the early warm weather and the sight and scent of flowers (hopefully without too many insects!).
And if your mona includes eggs, it’s quite traditional to ‘crack’ them on the forehead of your family members or friends… preferably by surprise! 🤪

Ingredients
This makes one really big mona, or two medium monas. Or, I suppose you could divide it further and make them into four smallish ones. Or maybe just use half the amounts 😃
- 50 g fresh yeast (or 25 g dried / instant)
- 100 g lukewarm milk
- 150 g sugar
- 30 g orange juice (approximately, juice of 1/2 a medium-sized orange)
- 60 olive oil, plus extra for oiling + kneading
- zest of 1/2 medium-sized lemon, zest of 1/2 medium-sized orange
- 3 eggs (~166g)
- 550g strong white flour (or just plain flour for a lighter, softer sponge)
- Optional: another egg, more milk, and icing sugar, for decorating
- optional: 1 tbsp orange blossom water
Preparation
Mix the yeast with lukewarm milk, and dissolve.
Add everything, except the flour. Mix it well.
Add flour slowly and mix it all well. It will be a really sticky dough and it’ll be hard to handle.
My “trick” at this point is:
- place the dough in the bowl and cover with a shower cap or similar
- wait 10 minutes
- lightly oil my hands, then give the dough a very light kneading cycle, where I gently stretch outwards and fold inwards and press around the dough to ensure there are no lumps, turning in a circular motion.

I repeat this cycle several times, until the dough starts to feel not lumpy at all, becomes a lot less sticky and more like a properly elasticated dough and I can start either stretch a bit more before folding inwards, or even apply “blanket folds” to it (where you fold 1/3 from left to right, right to left, up from bottom, bottom to up) before placing it back in the bowl.
How many times you repeat this cycle depends on the flour you’re using, how much water it absorbs, and how fast. I generally tend to repeat this about three times, but you might need more. And you’ll have to trust your observation skills.
Once the dough is starting to look smoother, cover and leave to rest for approximately 2 hours.

De-gas the dough by punching it down, or optionally give it another blanket fold, cover, and wait another 2 hours.

The dough should be quite smooth and puffy at this point. It’s been proving for 4 hours!
This is the time for dividing and shaping.
Do a blanket fold, then divide in portions (if you want smaller monas) and shape each one into a ball, adding tension to the surface. Then, place them in trays and cover with a cloth so they don’t dry out in their final rest time.

If you place them in the same tray, do make sure they’re properly separated as otherwise they’ll get fused together during proving or baking… and you don’t want that after doing all the work you’ve done so far!
Leave them to rest for another two to four hours.

About 40 minutes before rest time finishes, pre-heat the oven to 175ºC (with fan). That’s about the time it takes for our oven to reach that temperature, but yours might be different!
When proving is finished, whisk an egg together with a dash of milk, and paint the top of the monas with this glazing.

Bake for 15 minutes. They will start getting a nice gold brown colour.
After 15 minutes, you might want to take the tray out and turn it around so they get coloured uniformly.
Once they’re out of the oven, finish decorating: sieve icing sugar on top while it’s still warm.
Then, transfer to a wire rack to cool down and to avoid the bottom getting soggy.
Tips & tricks
Resting times are only indicative. This recipe depends a lot on room temperatures, so you’d better guide yourself by how the dough feels to you, rather than the stated times. You want it to be ‘spongey’, like a really big bouncy marshmallow.
Our kitchen was at around 19ºC which is a touch colder than ideal, so I just let things rest for longer. But if it were even colder, I’d use the oven with the light on.
My note of caution would be to be very careful about the oven temperature. You don’t want it to be TOO HOT or the outside will brown too quickly and the inside will end up undercooked! Do use an oven thermometer if possible—most ovens lie about the temperature they’re at.
A “to do” item in my list is to try and figure out if this can be made using a sourdough starter—I wonder if the sourdough fermentation would work with the rest of ingredients (sugar, orange juice) as I heard that they can interfere with the yeasts, but I am really curious to see a springy mona. Maybe this is the next thing I try… 🤔
Serving
This is great on its own, or you could do it the traditional way and have some hot chocolate with it. It’s mandatory to dip pieces of mona on the chocolate and get your fingers in the mix as well, then touch everything with your dirty fingers and make a mess.

Alternatively, you could have a couple squares of a chocolate bar with it. Take a bite of chocolate and let it melt in your mouth, then bite into your piece of mona. This more ‘portable’ version is what people do when they take they go on the countryside walk.
Storing
To keep it fresh for longer, store in a box or similar where it doesn’t dry out. If you don’t have a box that big, a plastic bag is perfectly fine and exactly what I do.
Store bought monas don’t last more than a day or two before they get sadly dry, but these home made ones do last a whole week with just moderate drying out. Maybe something to do with using good ingredients? Because of very long fermentation times? Who knows!
Trivia
There are many other ways to style monas, from shaping them as plaits, little animals (dragons! rabbits!) to even sprinkling them with colourful confetti sugar. But these shapes are normally reserved for “kids”.
Interestingly, they also eat “monas” in Barcelona during Easter, but what they call “monas” are actually really elaborate constructions made of chocolate. Think of chocolate castles and all other sorts of monumental chocolate sculptures. And of course, big chocolate eggs are popular there as well.
When I was about three years old, my parents went to Barcelona and brought my grandparents one of these big chocolate eggs which was meant to be “for Easter”. They placed it on a place of pride over a console table in the living room as the wrapping foil was very pretty. On closer inspection, I discovered that the egg seemed to have been knocked on a side and the foil was peeling off and you could see a little hole in the surface of the egg… and I thought that maybe no one would notice if I took some of the broken ‘shell’ away. This resulted in a series of trips to the living room (and to the egg), which by the time Easter arrived had diminished quite a bit in size and didn’t look as pretty and monumental as it did at the beginning. What I don’t remember is if anyone “caught me” or if the blame went to someone else with known sweet tooth!? 😅
Finally, a funny Spanish expression for the linguists over here: when someone looks absent-minded, we say that the person is “pensando en la mona de Pascua” i.e. thinking of the Easter monas. And frankly, who can blame them? Once you try a good one, it’s very understandable that you spend some time thinking about them. I, for one, spent all the pre-Easter week doing that: how I’d bake them, what I’d do differently this year, where to source ingredients… ?
The Wikipedia page has several pictures showing the different types of mona, and lots of other trivia, of course.
I need to make this now! once we are settled…
Yes! L is telling me that the proof of the recipe’s quality will be if someone else makes a mona! I need to be vindicated, haha!